ALSA Sine-wave Generator
Lately I’ve been tinkering with DSP and playing audio using ALSA. So far it has just been some basic tone generation to test the playback code so that I can reuse it for further projects. This article is just to demonstrate basic playback using the memory-mapped (mmap) functionality. As a primarily embedded/firmware developer this is more my territory. There’s a whole load of information out there for writing sound engines using ALSA such as 1 2 and 3 which I used as a reference.
For the uninitiated, memory mapped means that the code will be writing audio samples directly to the memory buffer used by the underlying sound driver, as opposed to the library copying the samples under the hood.
Preliminary stuff
ALSA (advanced Linux sound architecture) is a low level interface for interacting with sound drivers on Linux. To develop our own code we first (assuming ALSA is already installed) need to install the relevant libraries using your package manager. I’m using Manjaro so for me it is:
$ sudo pacman -S alsa-libIf you want to model the resonator in python then you’ll need to install numpy and matplotlib using pip using the following:
$ pip install numpy
$ pip install matplotlib
$ pip install scipy
Initialising the ALSA interface
To begin with the ALSA interface needs instantiating. Using the snd_pcm_open() function a PCM handle is initialised with reference to the sound card, the type of stream and whether the instance should block when waiting for samples. Once instantiated, this handle is used by the program to interact with the ALSA device and to read/write audio.
#include "alsa/asoundlib.h"

snd_pcm_t * handle;

snd_pcm_open( &handle,
            "plughw:1,0",
            SND_PCM_STREAM_PLAYBACK,
            SND_PCM_NONBLOCK);
In the code snippet above, we have instantiated the PCM handle for device plughw:1,0 and configured it for non-blocking playback. This string representing the audio device doesn’t make much sense at first. The first number 1 represents the ‘card’ and and second 0 represents the device. In order to set this for your sound device, you can use the following command which will list all the audio devices:
$ aplay -l
**** List of PLAYBACK Hardware Devices ****
card 0: Generic [HD-Audio Generic], device 3: HDMI 0 [HDMI 0]
  Subdevices: 1/1
  Subdevice #0: subdevice #0
card 0: Generic [HD-Audio Generic], device 7: HDMI 1 [HDMI 1]
  Subdevices: 1/1
  Subdevice #0: subdevice #0
card 0: Generic [HD-Audio Generic], device 8: HDMI 2 [HDMI 2]
  Subdevices: 1/1
  Subdevice #0: subdevice #0
card 0: Generic [HD-Audio Generic], device 9: HDMI 3 [HDMI 3]
  Subdevices: 1/1
  Subdevice #0: subdevice #0
card 1: Generic_1 [HD-Audio Generic], device 0: ALC1220 Analog [ALC1220 Analog]
  Subdevices: 1/1
  Subdevice #0: subdevice #0
As you can see in the snippet above I used the final device listed, which is the 3.5mm audio jack out of my computer.
Once the PCM handle is initialised the device needs to be configured with the parameters you intend to use for writing audio samples. The ALSA library provides functions for setting everything individually, but for this example I’ve used the “simple” interface using the following function:
snd_pcm_set_params( handle,
        SND_PCM_FORMAT_FLOAT_LE,            /* little endian*/
        SND_PCM_ACCESS_MMAP_NONINTERLEAVED, /* interleaved */
        2U,                                 /* channels */
        44100U,                             /* sample rate */
        0U,                                 /* alsa resampling */
        10000U);                            /* desired latency in us */
This function initialises the pcm handle with the following configuration:
SND_PCM_FORMAT_FLOAT_LE- This specifies the audio format that the ALSA interface should expect. I’ve chosen 32-bit floats because it makes the IIR resonator simpler to implement, it has a range of -1.0 to 1.0 4
SND_PCM_ACCESS_MMAP_NONINTERLEAVED- This specifies that samples are not interleaved, IE, there are two buffers where 8 samples would be written as LLLL and RRRR. If I’d configured the interface to have interleaved samples, then there would be a single buffer with the samples written LRLRLRLR.
2U- Number of channels, IE left and right. You could have 1 channel with mono audio if you wanted.
44100U- Audio sampling rate, which means the maximum frequency that we can output of this interface is
fs/2 == 22050 Hz
- Audio sampling rate, which means the maximum frequency that we can output of this interface is
0U- ALSA resampling, which specifies whether the ALSA interface will resample the audio before being played by the sound card, I don’t know too much about this option to be honest.
10000U- This is the latency of the ALSA interface measured in microseconds (us). If you want a more responsive and real-time sound engine, then lower this number. Make this number too low and you still start getting under-run, where the program cannot generate samples fast enough for the audio device.
In the configuration I’ve selected 32-bit floats. I like using typed variables, so have created a typedef for the normal float variable, with a static assertion should it ever change size for whatever reason.
#include <assert.h>

typedef float float32_t;
_Static_assert( sizeof(float32_t) == 4U, "float32 not expected size" );
At this point the ALSA interface is initialised and you could start outputting real-time data from the output buffers using:
snd_pcm_start( handle );However, this will immediately start outputting samples that are in the output buffer, which to my understanding are not guaranteed to be non-zero. In order to address this, it is necessary to ‘preload’ the buffers with zeros (or whatever samples you want) before calling the snd_pcm_start() function. Accessing these buffers is the same whether the real-time loop is running or not and is discussed in detail in the following sections:
Accessing the memory buffers and writing samples
In order to access the memory buffers, the ALSA documentation 5 states that it is necessary to call the following function first:
snd_pcm_sframes_t frames = snd_pcm_avail_update( handle );This function will return the number of frames that are available to be written to the output buffers. It is worth highlighting that this function returns a signed value, which represents an error code if negative.
Once frames are available, you’ll need to call snd_pcm_mmap_begin() with the following parameters:
snd_pcm_uframes_t offset; /* Offset to first sample */
snd_pcm_uframes_t frames; /* Number of samples available to write */
const snd_pcm_channel_area_t * areas; /* Ptr to buffers in memory */

snd_pcm_mmap_begin(handle, &areas, &offset, &frames);
Upon successful operation this function populates the areas struct with the following information as detailed by the ALSA documentation6:
addr- Base address of the output buffer, requires casting to whatever type you’re using (in this case,
float32_t
- Base address of the output buffer, requires casting to whatever type you’re using (in this case,
first- Offset to first sample in bits
step- Sample size in bits
Once the snd_pcm_mmap_begin() function is invoked, you first need to cast the base address to the appropriate type, which in this case is float32_t. You’ll notice that areas points to a 2d array, one for each channel. For a mono audio interface, you only need to interact with the 0th index.
float32_t *left = (float32_t *)areas[0U].addr;
float32_t *right = (float32_t *)areas[1U].addr;
Then you need to add the first offset, which is in bits. I’ve assumed here that this offset is always going to be a multiple of 32. The shift right by 5 is a division by 32 so that the pointer is updated correctly. (I’m admittedly being lazy by this assumption, a better way would be to initially case to a uint8_t, increment byte by byte, and then cast the resulting pointer to float32_t)
left += ( areas[0U].first >> 5U );
right += ( areas[1U].first >> 5U );
Finally, add the offset, which is in samples confusingly:
left += offset;
right += offset;
Given that the ALSA interface is configured to use 32-bit floats, I usually add an assertion verifying that the step value is always 32-bit:
assert( areas[0U].step == 32 );
assert( areas[1U].step == 32 );
Alright, now we’re ready to write samples! All we need to do now is generate the next sample and assign it to the pointer that is dereferenced at incrementing indices like in the following snippet:
for( uint32_t idx = 0; idx < frames; idx++ )
{
    left[idx] = NewSample();
    right[idx] = NewSample();
}
Once this loop completes, the samples are committed to the interface using the following function:
snd_pcm_mmap_commit(handle, offset, frames);Where offset is the same variable as the one used earlier and frames is the number of frames that require committing, which in this case is the number of frames available.
Runtime
Now that we’ve discussed writing to the output buffers, all that is required is a simple audio loop that checks whether there are frames available to write and if so, calculate and write them. An example of a simple ‘super loop’ for an audio playback program is detailed below:
static void Loop(void)
{
    const snd_pcm_sframes_t frames =snd_pcm_avail_update( handle );

    if( frames > 0 )
    {
        /* Calculate and write new samples */
        CalculateAndWriteNewSamples();
    }
    else if( frames < 0 )
    {
        /* Handle Error */
    }
    else
    {
        /* Do Nothing / something else */
    }
}
Error Handing
So far I’ve neglected to include error handling in the code provided, which is bad. You most definitely want to handle the errors gracefully, or at least output them to the console to give clues as to why a particular function call is failing. I typically wrap function calls in the following macro in order to print out error information and kill the program with the failing assertion:
#define ALSA_FUNC(X) \
{ \
    int err = (X) ; \
    if( err < 0 ) \
    { \
        printf("ALSA error!: %s\n", \
                snd_strerror(err)); \
        assert(false); \
    } \
} \

/* Example usage */
ALSA_FUNC(snd_pcm_mmap_begin(handle, &areas, &offset, &frames));
Resonator
While browsing for interesting/efficient ways of generating sine waves I came across this(7) article about different techniques for embedded platforms. I highly recommend reading the article as there is a lot of interesting stuff on there. Of particular interest to me was the IIR resonator which uses a zero and a pair of poles to produce a sine wave. The input simply requires a unit impulse and the output will continue to resonate a sine wave at the given frequency. I modelled it in python and was impressed with its simplicity and accuracy. The code snippet below and accompanying diagram shows the implementation in python. As you can see there is a single peak at 1kHz which is what we expect. Browsing around online I found 8 and 9 which provide further explanation for how this resonator technique works.
import numpy as np
import matplotlib.pyplot as plt
from scipy import signal

num_samples = 4096
fs = 48000
f = 1000
A = 1

w = (2 * np.pi * f) / fs

b0 = A * np.sin(w)
a1 = -2 * np.cos(w)
a2 = 1

x = signal.unit_impulse(num_samples)
y = np.zeros(num_samples)

for i in range(num_samples):
    y[i] = (x[i] * b0) - (a1 * y[i - 1]) - (a2 * y[i - 2])

# Calculate FFT
Y = np.abs(np.fft.fft(y, num_samples, norm="ortho"))
f_scale = (fs / 2) * np.linspace(0, 1, int(num_samples / 2))
Y_db = 20 * np.log10(Y[: int(len(Y) / 2)])

plt.subplot(2, 1, 1)
plt.plot(y)
plt.xlabel("Samples")
plt.ylabel("Amplitude")

plt.subplot(2, 1, 2)
plt.semilogx(f_scale, Y_db)
plt.xlabel("Frequency (Hz)")
plt.ylabel("Magnitude (dB)")

plt.show()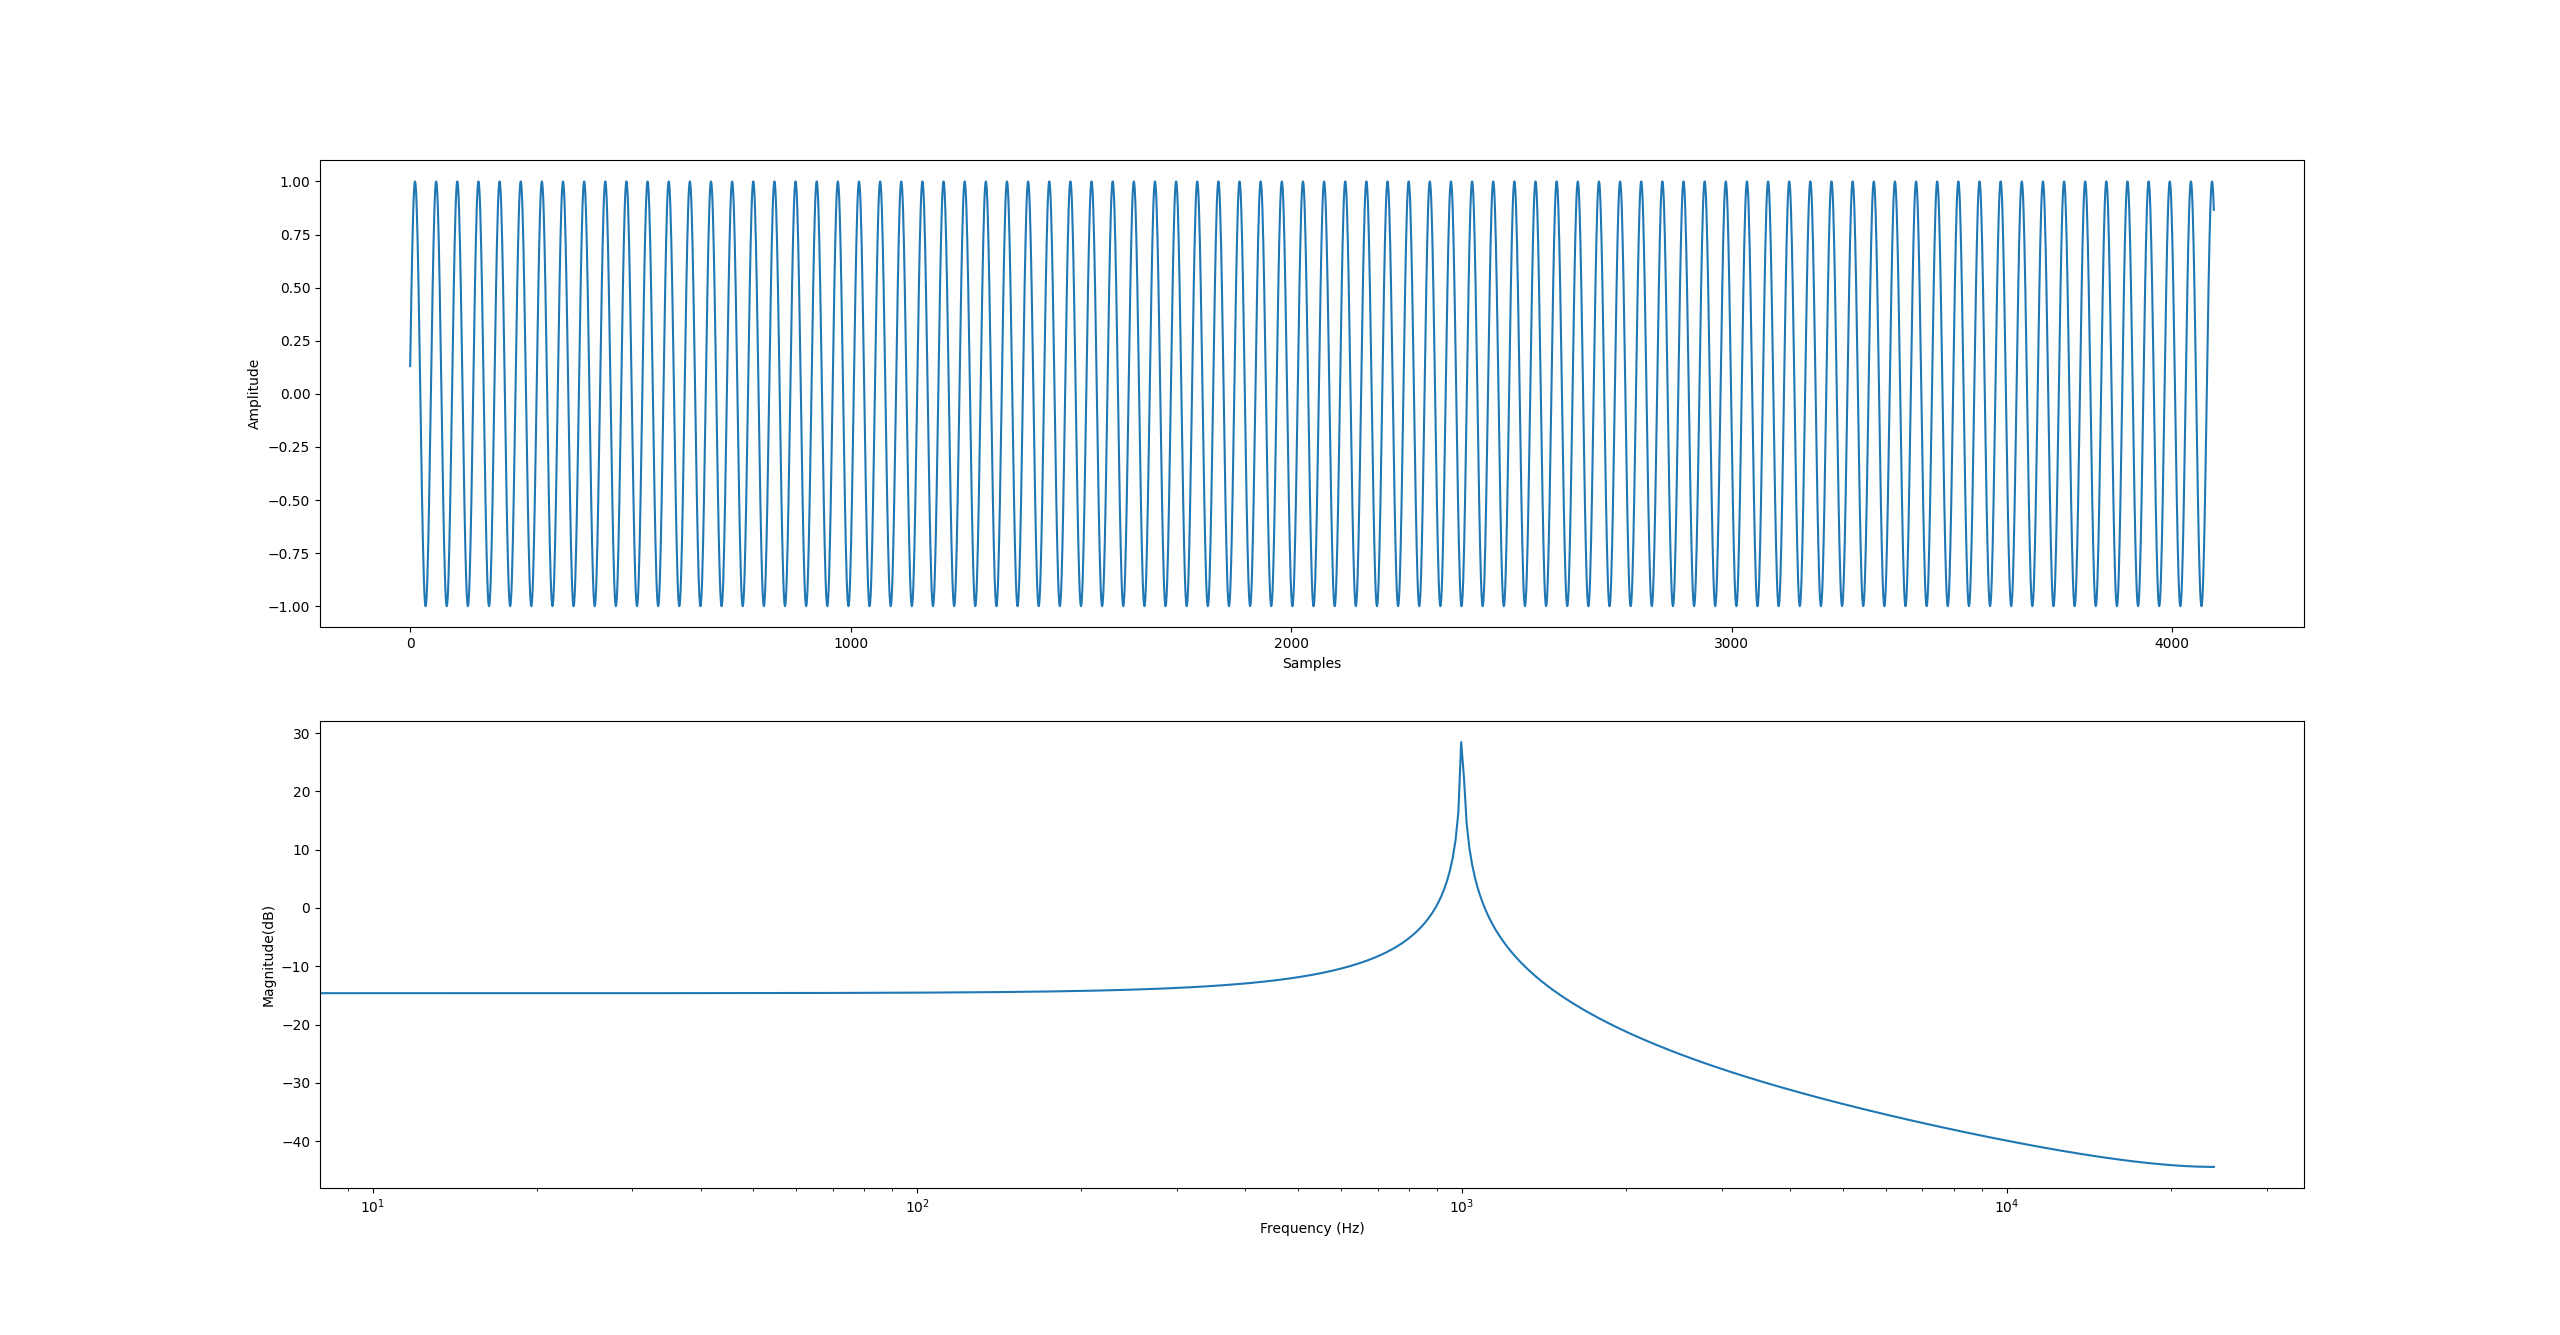
Figure 1 - Modelling of a sine-wave resonator in Python
In order to use this technique for real time audio generation we need to rewrite this in C. First I defined a structure that represents a resonator:
typedef struct
{
    float32_t a1;
    float32_t a2;
    float32_t y[2];
}
resonator_t;
You’ll notice the feed forward coefficient b0 is missing, I’ll cover that shortly. This struct contains the two feedback coefficients a1 and a2 as well as the previous two output values from the resonator. Next I created an initialization function to calculate the coefficients as well as the first sample:
#include <assert.h>
#include <math.h>

typedef struct
{
    float32_t freq;         /* Desired Frequency (Hz) */
    float32_t fs;           /* Sample Rate (Hz) */
    float32_t amplitude;    /* Desired Amplitude (0 -> 0.999999) */
}
resonator_config_t;

extern void Resonator_Init(resonator_t * const r, const resonator_config_t * const config)
{
    assert( r != NULL ); /* NULL ptr check */
    assert( config != NULL );
    assert( config->amplitude < 1.f );  /* A of 1.0f can overflow 'coz floats */
    assert( config->freq < config->fs ); /* Desired f cannot be > fs */

    float32_t omega = (2.0f * M_PI * config->freq) / config->fs;

    float32_t b0 = config->amplitude * sinf(omega);
    r->a1 = -2.f * cosf(omega);
    r->a2 = 1.f;

    r->y[0] = (1.0 * b0);
    r->y[1] = 0.f;
}
As you can see, this function calculates the necessary coefficients using the equations outlined in 7 and 9. The b0 coefficient is missing from the resonator_t struct because it is only required to calculate the very first sample, the remaining samples are generated only by the feedback coefficients as input samples x[1:INF] are all zero. I’ve also added an assertion to this function to ensure the desired amplitude is less than 1.0f. I’ve found that if I use 1.0f exactly, you can sometimes get overflows due to the float calculations resulting in a value of 1.000000005f as an example. Having an amplitude less than 1.0f avoids this.
The only other function required is for calculating the next sample from the IIR resonator:
extern float32_t Resonator_NewSample(resonator_t * const r)
{
    assert( r != NULL );

    float32_t y = -(r->a1 * r->y[0]) - (r->a2 * r->y[1]);

    r->y[1] = r->y[0];
    r->y[0] = y;

    return y;
}
This function calculates the next sample and updates the history buffer.
Putting it all together
For the sake of simplicity I have encapsulated all the necessary components in a single monolithic C file you can find here. Of course it is much better practice to separate all these components (ALSA, Resonator) into individual files. I normally use CMake to build personal projects, but you can compile this using the following command line instructions:
$ gcc -std=gnu11 audio.c -o audio.out -lasound -lmResults
I connected a scope up to the audio output on my computer so that I could see the results. Upon compiling and running the program, you should get two sine waves like on the oscilloscope screenshot below.

Figure 2 - Audio output from audio.out as viewed on Oscilloscope
Summary
Hopefully this demystifies the coding of basic audio applications using ALSA! I’ve got some other audio projects in the works that use this as a base so figured I’d write an initial post outlining how to write a basic audio application in C using ALSA.
References
-
Audio API Quick Start Guide: Playing and Recording Sound on Linux, Windows, FreeBSD and macOS link ↩
-
ALSA project - the C library reference - PCM Interface link ↩
-
ALSA project - the C library reference - Direct Access (MMAP) Functions link ↩
-
ALSA project - the C library reference -
snd_pcm_channel_area_tStruct Reference link ↩ -
What’s your sine? Finding the right algorithm for digital frequency synthesis on a DSP link ↩ ↩2
-
Application Report SPRA708: TMS320C62x Algorithm: Sine Wave Generation link ↩
-
StackOverflow: Sinewave generation with an IIR filter (suggested books) link ↩ ↩2